Wednesday 24 September 2014

Tutorial: Painting British WW2 Commandos Part 1

Hi folks, 

Today I'm pleased to introduce you to Troy Brand of Brand Painting Studios who will be showing us how to paint World War 2 British soldiers like a pro.  If you're not a WW2 gamer you might find the colour scheme and techniques useful for painting imperial Guard or other SciFi troopers. That's all from me, over to Troy!

Ed

Warlord Games WW2 British Commandos
A couple of weeks ago I got my hands on some of Warlord Games' WW2 British Commandos. My first impression of them is that they are very well made. There are only a few mould lines to file off and all the pieces fit together very nicely. Some pieces, like the stocks on the sten guns, are very flimsy and prone to snapping before even clipping them off the sprue.  Another good impression it made is that the sprue contains more than enough arms, heads, berets, helmets and accessories to have a huge variety of poses, weapons and faces. So, having sat down and examined the pieces one by one and deciding on the poses I wanted, I went ahead with my little project.

Getting the right colour scheme

It is perfectly acceptable to paint Space Marines in red. However, anyone would consider it a cardinal sin to paint Red Army soldiers in that colour, and equally sinful to dress soldiers of the Wehrmacht in pink, however funny the implication might be. So the first thing to do before even priming your models is to look for reference material to get the colour schemes as accurate as possible. This also means researching the colours of the equipment as well as the uniforms themselves.  The internet is full of very good (and bad) sources for this but I found this rather handy picture on the Encyclopaedia Britannica's website which makes a nice reference.

British Commando Normandy campaign
British commando from 1944-45

Preparing the model


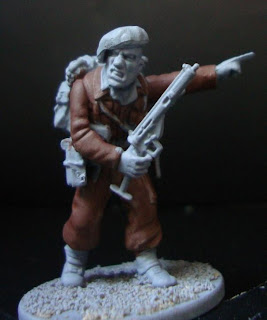
One plastic 28mm commando ready for painting
One 28mm plastic Commado ready for painting!
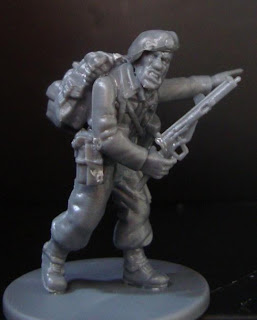
Once I had decided what colours I would use to represent our commando and his equipment, I decided I would try using a beret and equip the model with a sten gun, canteen and rucksack.After I had clipped the pieces I needed for the first model and filed them as necessary I put the model together and based it with some Citadel sand.


I proceeded to undercoat the model with Grey spray primer from Humbrol. Lately I find grey to be a perfectly good compromise between black and white. This has to do with the type of paints I normally use, which are acrylics. They usually need to be thinned down in order not to obscure detail. Two or more thin coats of paint are usually enough to cover a surface. Still, the paints retain a certain transparency. This allows for the colour to appear muted if the undercoat is black, or equally very bright if the undercoat is white.  Grey being more neutral allows for the true pigment of the paint to show after the second thin coat.

Painting the Commando's uniform

Painting World War 2 British uniform - base coat
Base coating the uniform
Having looked again at my reference, I picked Vallejo Flat Brown for the uniform. When painting large numbers of models it is easier to paint from one darker base coat and build highlights from it. There are other techniques which require the use of a neutral colour onto which shadows and highlights will be added, but for this model in particular, this was not to be.


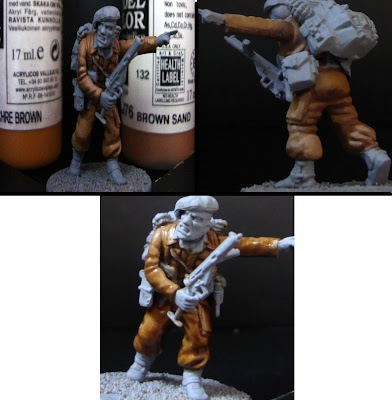
Once the base coat was painted I then went on to paint the first highlights. These were achieved by layering on a 1-1 mix of Vallejo's Ochre Brown and Brown Sand. To this mixture I added a drop (or less than) of Vallejo Off White for the second layered highlight.
Painting World War 2 British uniform
Clockwise: First highlight, second highlight, wash for shading.
Like I mentioned earlier, some techniques involve darkening and highlighting certain areas of the model by blending in different shades from a neutral base. However for this model I have applied a more traditional technique of layering highlights on to a darker shade then using a wash to produce a smoother transition from light to dark as, after a couple of lighter layers it would not have looked very natural. To achieve this I used Vallejo's Sepia Shade. Another good wash would have been Citadel's Agrax Earthshade but I prefer Vallejo's because of a higher pigment saturation. If you have the old Citadel Devlan Mud, I would recommend it for this also.


Painting World War 2 British Commandos: Part 2
Troy continues his tutorial with tips on how to paint skin tones.
 If you enjoyed this tutorial, check out Troy's website. He does commission work and his rates are very reasonable. Ed

Tuesday 27 August 2013

Conversion - Amazons with bolas

Once again we have a conversion tutorial and this time John uses the power of superglue to arm his Amazons with bolas. Whilst I haven't yet tangled with them on the tabletop ...okay, okay I'll get my coat and leave you to the tutorial... :-)

We've started playing a war game that has a rule in it that allows for entangling opponents. The miniatures I chose to play are Amazon warriors and while I'm extremely pleased with the choice, there weren't any weapons included with the figures that would be able to entangle an opponent. My choices for the ancient history period we're in are fairly limited (basically a net or a bola). After very brief consideration I decided to see if I could fashion a bola or two for my miniatures.

Wargames Factory Amazon with bola conversion
I started off looking up how the bola is made normally. Apparently it's simply three leather or rope cords about 2 or 3 foot long that are tied in together in a knot at one end; weights (stones, metal bits, etc) are fastened to the other end. The thrower uses the knotted end as a handle and swings it round and releases toward the target (s)he wishes to ensnare.

Wargames Factory Amazon with bola conversion
To create my bolas, first I got a bit of thread and three tiny beads. I probably should have used smaller beads or made the weights from a bit of greenstuff as I think the end result may be a bit big as far as the weights are concerned, but what I had at hand was what I used.

I measured and cut three pieces of the thread into 2 inch sections and tied them together at one end. In hindsight, it probably would have been better to measure out 6-7 inches per piece and tie them together and then cut off the excess to the correct length, as that would have made tying them easier.

Once the three pieces were tied I slid one bead on far enough that the end would wrap around the bead and touch back to the main piece of thread. With a touch of super glue I affixed the bead in place and then wrapped the end over the bead and fastened it to the thread with another drop of super glue. I repeated the process for each of the other two threads.

At this point I was fairly happy with my bola. It was quite floppy but I thought it was a good representation of what I wanted. My next task was to superglue the bola to the figure. In the process I accidentally got superglue all over the thread and my fingers, which caused the happy consequence of making all of the threads stand stiff. I let them dry in that position while I cleaned the glue off my fingers and then finally glued the first bola to the figure.

I followed the same process for the second bola (avoiding gluing my fingers the second time). After a spray undercoat of khaki color, bleach boned on the thread and then a wash in sepia, the cords were completed. Ghost grey was used for the weighted ends.

Wargames Factory Amazon with bola conversion


Wargames Factory Amazon with bola conversion


Wargames Factory Amazon with bola conversion

Wednesday 21 August 2013

Fortune Points: Giving the players control

Somewhat over a year ago I discovered a really interesting post apocalypse RPG called Atomic Highway. I can't remember exactly how I came across it but I know that I first used to to run a modern day cops scenario for some new role players which went really well. It's a very simple, rules light system that I thoroughly recommend you check out. It's also free in PDF form. :-)

Anyhow, although I love the system in it's entirety there's one part that I've ported over to other RPGs, especially Pathfinder, because it's such a good mechanic. It's called Fortune Points and there are similarities with bennies in Savage Worlds, fate points in WFRP and, of course, Hero Points in Pathfinder. I always felt that Hero Points were a bit fiddly and limited so I never actually used them.  Anyhow, whilst it's not an original mechanic per se it's the best implementation of it that I've personally come across.  I shan't outline the original mechanics here; Atomic Highway is well worth a read if you're interested in the original, instead I'm just going to talk about how I converted them to use in Pathfinder.

Fortune Points in Pathfinder RPG

I start with about 20 Fortune Points (FPs) divided amongst all the players, so depending on how many people there are, players get between three and five each. I sometimes give out  extra ones during play if someone does something particularly cool or funny but usually just two or three over a four hour session.  I always have physical counters that people can pick up and pass around, somehow it's just better than making them another number on the character sheet.

If you want to just test out the mechanic in your game you might try giving one to each player to start with.

Using Fortune Points

You can use Fortune Points in the following ways:
  • You can spend one FP to change one d20 roll to a natural 20. You can't score critical hits from doing this but that's the only limit. You can use one to confirm a critical. You can only affect d20 rolls so damage cannot be affect.
  • You can spend two FPs to create a plot tweak, a small change in the plot that you want to see happen.
  • You can spend more plot points, typically five, to create a plot twist which is a more major change in the plot.
  • Players may spend points on other players if they wish. They may also club together to buy plot twists and tweaks.

How this changes the game... in my experience.

Naturally this mechanic creates a few changes in the game dynamics but my group has found them really positive. The other members of the group who GM use them as well now. Your mileage may vary of course. Below I talk about the changes I've seen in about 15 months of using them in weekly games as both a player and a GM.  In general, being able to buy a roll of 20 when you really want one speeds up combat and mitigates the bad dice rolls that afflict some players.  Buying plot twists and tweaks allow the player to influence the story more.

Buying a 20

Player: "Darn, I missed and I'm sure I just need one more hit to bring him down. Okay, I'll spend a Fortune Point...

Fights go quicker because players spend FPs at important moments to get a hit or confirm a critical.

Player: "I leap across the chasm... Darn, I rolled a one. I'll spend a Fortune Point. Sooo, I leap across the chasm..."

I think you also get a bit more of a cinematic feel because dramatic moments are less likely to be killed by bad dice rolls.

GM: "The dragon sends ball of fire towards you. Make a Reflex save."
PlayerRolls dice. "Agh! Okay, I'll spend my last Fortune Point that's half damage. I'm still alive - barely."

Fortune points also help out with failed saves making the characters better able to deal with spellcasters and other creatures out of their league... at least for a while. I like this because it means I can put the party up against enemies which are mechanically too tough for them but should logically be be present in a given situation. You see the heroes get out of deadly situations by the power of fate, just like in a film or a book.  Players seem to enjoy that because it makes it easier for them to do cool things. And that's a big part of why we play.

But - and here's an important point folks; yes, Fortune Points give the PCs a bit more power but they don't make them invincible. If you're running a game with a lot of deaths this will slow it down but won't stop it.

Tweaking and twisting the plot

So much for buying the rolls you want. What about these plot twists and tweaks I hear you ask? Isn't that asking for trouble? Won't the players derail my game? Speaking as a low prep GM who does a lot of improvisation anyway, no.  Personally, I take the view that a large part of GMing is thinking on your feet anyway.  If you are someone who prepares in detail and finds it tough to improvise, then this might not be so good for you.

However, for me it makes GMing easier because it takes some of the work away from me and gives it to the players. It also means that the players have a way of telling me what they think is cool and want to see happen within the game mechanics. Having a mechanic for this makes it much easier for me to know what they want to see happen and what they think will be fun, and saves me a lot of guesswork. You can also find out how much they want to see it happen by how many points they're willing to spend and which players are willing to contribute points to make it happen. Keep in mind you can always refuse a plot twist, although I find it's seldom necessary.

You might well be asking what the difference between a plot teak and a plot twist is. To be honest it's pretty subjective as it depends on the individual GM.  A twist is something you think should be more expensive than plot tweak. Sometimes I'll ask for three or four FPs if I think it's somewhere in the middle. Sometimes I'll make it cheaper or more expensive depending on how much I like the idea and how many FPs are left on the table.

A few examples will hopefully help illustrate the differences. All of these occurred in Pathfinder games I've run over the last year or so. 

  • The party have got themselves in trouble. They're in a demon infested wasteland, are injured and pretty much surrounded. The city which offers safety is another day's ride away. It was a big group and they offer me 9 FPs for some of the Paladins from the city to appear and rescue them.  Since it avoids a likely TPK I'm quite happy to accept this.
  • The party are visiting the castle of a rather unpleasant knight called Sir Leontes. The barbarian unintentionally kills him when a 'friendly' practice fight results in him doing over a 100 points of subdual damage in one hit. The party looks around at his assembled guards, who were watching the duel, and spend 7 FPs. They decide the dead knight was loathed by everyone, including his wife, liege lord and the king, and that nobody will shed any tears for him. Instead of getting into trouble they become quietly popular in the town.
  • Two friendly NPCs get statted up so that they can actually be of practical assistance to the party rather than just friends. One is a Cleric and the other is a Paladin. This is quite a big change but the party need all the help they can get at the moment so 5 FPs.
  • The enemy army is going to have to come through some paddy fields, slowing down their troops and giving the players an advantage. 4 FPs
  • Celene, an unscrupulous bard, has met a powerful fey called the King of the Forest. The player wants her to ingratiate herself in the fey court and offers me 3 FPs. I take them knowing that although it's a big change I'll be able to use it in interesting ways later on.
  • One of the players really wants a dragon as a pet and they've just met a dragon who they are talking to. She asks if she can trade a magic item to get an egg. Since the egg won't hatch until I want it to this isn't going to break the game in anyway. She gives me 2 FPs and persuades the dragon that her magic item really is better than one of it's eggs.
  • The party is carving out a kingdom for themselves but know that their enemies are only a few weeks away with a big army. They want the castles they control  to be well built and defensible. That doesn't seem like a big change as I was going to assume the castles were okay anyway so I just take 2 FPs.
  • One of the party's allies happens to be in town and heals them up after a recent encounter with a rival adventuring party. They don't have a cleric and it just saves them a bit of time and money so I take 2 FPs.
That's all, folks. Congratulations if you got to them end of this rather bumper post! If you try using Fortune Points in your games I'd love to hear how it works out for you. Feel free to come back and leave a comment.

Friday 9 August 2013

Instant Mold - Satyr Conversion

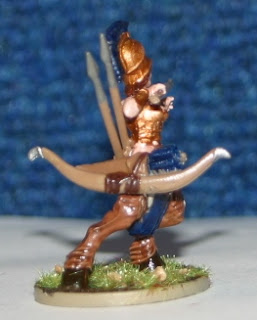
We're back with another tutorial from the prolific John Dulle whose Amazon warband has received yet more reinforcements. This time it's a female satyr, or faun as the Romans called them, involving assorted plastic bits, milliput and Instant Mold.

Having seen Eddie play a faun in our wargame, I thought it might not be a bad idea if my warband had one as well. The only problem is I wanted all my characters to be female and to look extremely similar. To remedy this, Eddie traded me some GW beastmen bodies for some of my Amazons.

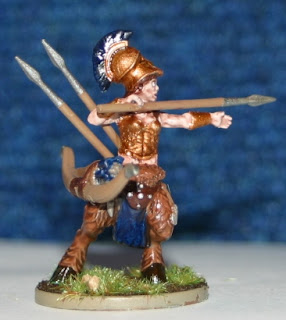
Finished  conversion using Instant Mold and plastic bits

Finished conversion using Instant Mold and plastic bits

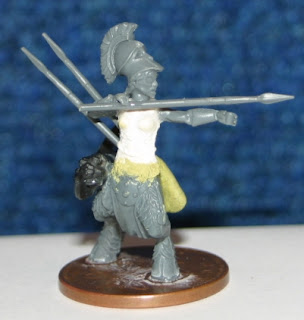
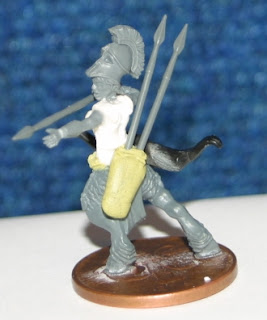
To start, I was running out of Amazons and wasn't sure how well the conversion might work, so I used a handy product called Instant Mold, which is a reusable material that can be used to create molds very easily and quickly (highly recommended). After melting the Instant Mold with boiling water and then putting it in the rough shape I needed, I created molds of the top half of a couple of my Amazon warriors; the top half is all I needed for a faun and a centaur (a separate project).

Once cooled, I used GEDEO brand resin plaster (similar to plaster of Paris but much harder when fully cured – I got mine at Hobby Craft) to cast two new top halves of my Amazons. Once cured (says 30 minutes to de-mold on the box but I suggest 2 to 24 hours to prevent crumbling), I then cleaned up the mold lines and set them aside for a few seconds while I hacked off the top half of the Beastman.

I then checked to see how the top and bottom halves would match up. After deciding on a good facing, I super glued the two pieces together. Because the two pieces had slightly different musculature, I needed to use a bit of filler to make the pieces appear to be seamless. I chose to use Milliput to do this (the choice was based on the quantity of the stuff I have that is beginning to get old).

Finally came putting the arms and head on the Amazon and deciding which weapons to outfit her with. Because I had a bit of left over Milliput and I'd chosen to outfit her with javelins, I decided to create a quiver for extra javelins and super glued it to her back.

Primed, painted, varnished, based and ready for battle.

Amazon satyr

Amazon satyr

Amazon satyr

Amazon satyr


Thursday 8 August 2013

Blog News: Egyptians, Living History and Blood Bowl

Well, it's been a while since I posted something that I wrote myself, since I've had tutorials written by friends to post up recently. Makes me feel kind of guilty... Things have been happening though, albeit not so much  here on the blog. Now that work has quietened down for the summer, I've managed to become a bit more productive in the hobby arena.

Like most long time gamers I've acquired a lot of stuff over the years and over the last couple of weeks I've been spending quite a bit of time sorting things out and putting them into some kind of order. The role playing stuff was relatively straightforward as I simply had to sort out books and throw away character sheets and campaign notes that I'd accumulated over the years. Despite the sentimental value of stuff that I'd written when I was a teenager I steeled myself and ruthlessly binned things. Sorting through my miniatures collection on the other hand is a much bigger job, mostly because I've not been terribly systematic about storing things in the past. Plus there's far less stuff that I can bring myself to simply throw away! It's quite rewarding though, and I've rediscovered a lot of old friends, some of whom which be useful in the near future. I now have plenty of orc and undead models to use as baddies in my RPGs. This is particularly handy since the players in my Pathfinder campaign are about to get involved in a war.  :-)

If you read this blog regularly, you've probably noticed I'm playing and organizing a Greek/Celtic/Egyptian/Persian mythic skirmish campaign using Song of Blades and Heroes which has been a lot of fun. The army lists I wrote seem to be working quite well so far although it looks like the Greeks need a bit of a boost as they're struggling against hordes of Persian undead.

I've also set myself the goal of getting a 300 point warband for each faction painted  by 1st September. So far I've nearly got the Greeks and Celts done and I've started on the Egyptians. I snapped a quick picture to show post up.  The guy with the blue shield is my finished test model and the others are painting in progress. They're from Wargods of Aegyptus by Crocodile Games and they're really nice models to paint, quite big with nicely defined areas and just the right amount of detail for my tastes.

Wargods of Aegyptus Asar Egyptians
Egyptians - painting in progress

It hasn't all been indoor activities though, I've also been on a few trips, notably to History Live 2013 up near Northampton. It's a big event with lectures from popular historians and 2000 reenactors covering everything from the Romans up to World War II.   It was a great weekend away with friends and family and there were loads of interesting things for a role-player and miniature painter to look at. Meeting reenactors is about as close to meeting real vikings or British Tommies as we'll ever get and it was great chatting with them. I took a load of photos which I'm slowly editing for the web so I can make a few posts with reference pictures for people. Some of them would be great inspiration for characters in an RPG and/or reference for miniature painters.

Norman shieldwall at History Live 2013
Just in case you thought I wasn't doing enough gaming, I'm meeting up with a friend for a game of Blood Bowl tomorrow. There's a league starting soon at the Gamers Guild - which is my FLGS - and I'm looking forward to a pre-season friendly to try out my roster. I've decided to do High Elves as I fancy playing a team that can handle the ball reliably. The last time I played in league I coached Vampires which was entertaining but mildly frustrating at times as it's a very random kind of team.

Looking ahead for Axes and Arrows, however, I've got a few things planned that I hope to get posted in the nearish future including: 
  • How to paint strip miniatures
  • How and why to thin your paints 
  • Reference photos from History Live
  • Giving players control of the story in a role-playing game
  • More conversion tutorials
Plus there should be some posts of things I've painted over the summer once they're all done and photographed.

On that note, I'm off to do some more painting..